The quick exhaust valve is a compact yet powerful component used in pneumatic systems to accelerate actuator return speed and enhance overall operational efficiency. While choosing the right valve is essential, proper installation is equally critical. An incorrectly installed quick exhaust valve can result in airflow restrictions, reduced performance, or even complete failure of the pneumatic circuit.
This guide provides practical and detailed tips on how to correctly install a quick exhaust valve to maximize its performance, longevity, and safety in industrial applications. Whether you're a maintenance technician, an engineer, or a plant manager, understanding these tips will help you achieve better system responsiveness and reliability.
Choosing the Correct Mounting Location
The performance of a quick exhaust valve is significantly influenced by its mounting location. A key function of this valve is to vent compressed air directly to the atmosphere, bypassing the directional control valve, thereby speeding up the retraction or extension of pneumatic actuators. If it is mounted too far from the actuator, the quick exhaust valve loses its primary benefit—rapid evacuation of air.
1. Keep It Close to the Actuator
The general rule of thumb is simple: the closer, the better. Installing the quick exhaust valve as near as possible to the actuator, especially to its working port, minimizes the volume of air that must travel through tubing before it is vented. This proximity significantly reduces backpressure and enhances the responsiveness of the actuator.
For instance, when a pneumatic cylinder extends and then retracts, the spent air must exit quickly to prepare for the next stroke. If the valve is placed directly at the cylinder port, it allows this exhaust to occur almost instantly, improving cycle times and overall system speed.
Tip: Consider using inline or direct-mount quick exhaust valves that are specifically designed to be attached directly to the actuator port. These types ensure the shortest and most efficient exhaust path.
2. Avoid Long Tubing Runs
Long or coiled tubing between the actuator and the valve introduces resistance and increases the volume of air to be exhausted. This creates backpressure, which slows the retraction process and reduces the efficiency of the entire system.
Best practice:
Keep tubing short and straight.
Avoid unnecessary bends, elbows, or kinks that can restrict airflow.
Use rigid or semi-rigid tubing where appropriate to minimize losses.

Orientation and Directionality
Another crucial aspect of installing a quick exhaust valve is ensuring correct orientation and directionality. These valves are designed with a specific airflow path in mind, and reversing or misaligning them can lead to performance issues or even system failure.
1. Follow the Flow Arrows
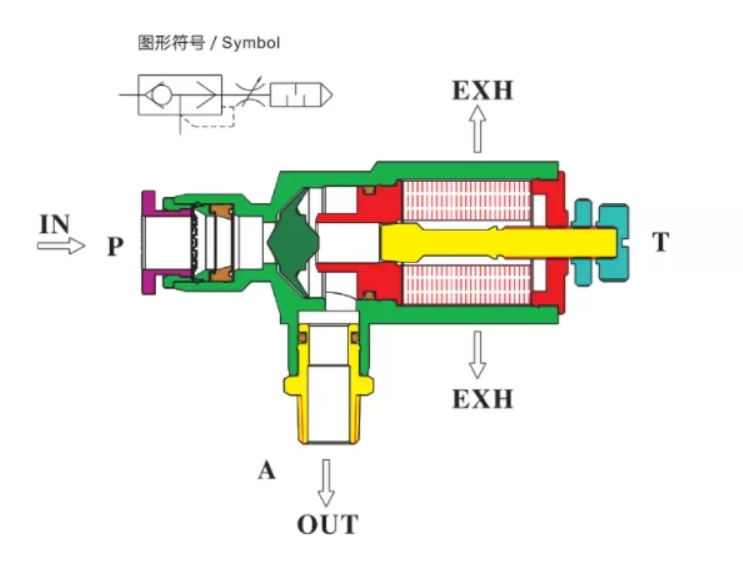
Most quick exhaust valves come with directional indicators—usually arrows or port labels such as:
“IN” or “C” for the compressed air inlet,
“CYL” for the actuator (cylinder) connection,
“EXH” for the exhaust outlet.
To ensure proper function:
Connect the compressed air supply to the IN/C port.
Attach the actuator or cylinder to the CYL port.
Make sure the EXH port is unobstructed and points to a safe venting area.
An improperly connected valve may not exhaust at all, or worse, may allow air to escape at the wrong time, disrupting actuator motion.
2. Don’t Install Backwards
One of the most common errors in quick exhaust valve installation is reversing the connections. A backward installation effectively disables the valve, preventing proper air discharge and potentially causing system malfunctions.
Helpful hint: Always refer to the manufacturer’s installation diagram or manual. Double-check the orientation before final tightening to avoid costly rework.
By paying close attention to the mounting location, tubing length, and directional setup, you ensure that your quick exhaust valve operates at peak efficiency, enhancing the reliability and performance of your pneumatic system.
Proper Sizing and Flow Capacity Matching
Using the wrong size valve can lead to system inefficiencies or failures. The valve’s flow capacity must match the actuator’s requirements for proper function.
1. Match Valve Size to Actuator and Tubing
The valve must be large enough to handle the actuator’s airflow demand but not so large that it becomes cumbersome or expensive.
Key considerations:
Cylinder bore size and stroke length
Required operating pressure
Flow rate (measured in SCFM or l/min)
If the valve is too small, it will restrict airflow and slow exhaust. If it’s too large, it may be difficult to control, especially in precision applications.
2. Use Manufacturer’s Charts
Most manufacturers provide sizing charts or flow capacity data that you can use to match the right valve to your application. These charts take into account pressure, volume, and speed requirements.
Using Compatible Fittings and Tubing
The performance of a quick exhaust valve doesn’t only depend on the valve itself. Fittings and tubing play a major role in ensuring leak-free, high-flow connections.
1. Select the Right Fittings
Use fittings that match the valve’s port size and material. A mismatch can lead to:
Leaks
Reduced flow
Early wear
2. Avoid Flow Restrictions
Even if the valve is properly sized, narrow tubing or restrictive fittings can choke the airflow.
Tip: Use full-bore fittings and smooth tubing for optimal performance.
3. Material Compatibility
Ensure that tubing and fittings are made from materials compatible with your system’s environment. For example:
In high-temperature applications, avoid plastic tubing.
In corrosive environments, choose stainless steel or coated fittings.
Avoiding Common Installation Mistakes
Many quick exhaust valve failures are due to avoidable installation mistakes. Being aware of these can save you time, money, and downtime.
1. Over-tightening Fittings
It’s a common misconception that tighter fittings ensure better sealing. However, over-tightening can:
Damage threads
Crack plastic valve bodies
Cause air leaks
Solution: Use a torque wrench and follow manufacturer torque specifications.
2. Improper Installation Angle
Some quick exhaust valves are sensitive to orientation, especially in dusty or humid environments.
Avoid:
Installing the exhaust port facing downward in dusty areas (dust can clog the exhaust path).
Facing the exhaust port upward in environments with falling debris.
Best practice: Install the valve horizontally or use protective exhaust mufflers.
Testing and Validation Post-Installation
After installing the quick exhaust valve, you should always run a series of tests to ensure everything is working as expected.
1. Perform a Leak Check
Apply air pressure to the system and spray soapy water around connections and valve joints. Watch for bubbles indicating air leaks.
Alternative: Use an ultrasonic leak detector for high-precision checks.
2. Benchmark Cycle Time
Measure the actuator's stroke time before and after installing the quick exhaust valve. A successful installation should show a notable reduction in retraction time.
Tip: Log these results for future maintenance and performance audits.
3. Validate Valve Activation
Check that the valve:
Closes during the supply phase
Opens instantly when pressure drops
Exhausts fully and quickly
Use pressure gauges or sensors to verify these events in real time.
Conclusion
Installing a quick exhaust valve correctly is more than just attaching it to your system. It requires thoughtful planning, careful placement, and proper sizing to achieve maximum efficiency. Whether you're upgrading an existing setup or integrating a new pneumatic system, these tips can help ensure you get the most from your quick exhaust valves.
Installation Checklist:
Install the valve as close as possible to the actuator
Ensure correct flow direction and valve orientation
Match the valve size to your actuator and flow requirements
Use compatible and non-restrictive fittings and tubing
Avoid overtightening and improper mounting angles
Perform leak checks and benchmark cycle times after installation
In critical automation applications, a well-installed quick exhaust valve can significantly enhance speed, reliability, and safety. If you're unsure about the right setup, it's wise to consult a professional.
Need expert advice or quality quick exhaust valves? Contact INTELL PNEUMATIC TECHNOLOGY CO., LTD — a trusted manufacturer known for durable and efficient pneumatic solutions. Their team can guide you in selecting and installing the right quick exhaust valve tailored to your automation system needs. Boost your efficiency with professional-grade components today!


